Facebook has got an incredible reach today which is reported to be over 1 billion active users per day. Last year, Facebook had introduced a lot of new features for groups to build communities and the trend will continue this year too.
Facebook groups have considerable advantages over Facebook pages when it comes to promoting a business. The primary goal of every business is to have a highly targeted audience to facilitate ease of conversion. Facebook groups help garner a high level of engagement and promote the business in a way desired by the business owner.
Many business owners create Facebook pages with the same intention and get disappointed when they do not receive the level of engagement they expected. Why does this happen?
The answer is multi-fold and requires that you understand how exactly Facebook Groups and Pages work.
Table of Contents
Facebook Page vs Group for Business
Facebook pages and groups have a significance of their own and serve different purposes. Our concern is to identify what promotes our business in the best way and explore that avenue.
Facebook Pages are meant for public figures, businesses and other entities to create an authentic and public presence on Facebook. A page is public by default and mainly serves the purpose of keeping your audience or followers informed about the developments or about various aspects of your business.
For example, you can follow Facebook pages related to products relevant to your business and get notifications about all their posts on your newsfeed. This will give you ideas to implement for your own business by keeping track of what others are doing.
Facebook Groups have different dynamics when compared to a page and are better suited for building a business. A Facebook Group is designed with the intention of encouraging communication within a small group of people where they can share their common interests and express their opinion.
Groups allow people to come together for a common cause and thus promotes a high level of engagement.
For example, you can join Facebook Groups related to your business and get an opportunity to identify and engage with your target audience. You can identify what your target audience wants and implement these ideas for your own business or with your own business page.
Benefits of Creating a Facebook Group for Your Business
As discussed, when it comes to growing your business with Facebook, Groups have certain advantages over Pages. Let’s discuss them in detail:
Build A Community
If you have a Facebook Page for your business, your content is constantly fighting for people’s attention along with other updates on their newsfeed. To tackle this problem, business owners require advertising budgets for using paid ads to continuously promote their businesses.
This challenge is eliminated by creating a Facebook Group for your business. Creating a Facebook Group is a great way to bring together and interact with a group of like-minded individuals. If you frequently indulge in a healthy discussion with your group audience, they will come to your group often to devour the content that you are offering.
Receive High Level of Engagement
People want to interact with a person and not a business or a company. This is the reason why business pages don’t receive the expected level of engagement.
If you have a group for your business, you will be the face of it. People will feel more comfortable to open up and share their concerns with you and thus help you understand the thoughts and concerns of your target audience.
Build a Relationship with Your Audience
As discussed, if you frequently interact with your audience, they will feel more connected to you. By answering their questions and solving their problems, you will be perceived as an expert and will be the go-to guy when they need help.
This builds trust, which is the foundation for all business transactions. The group enables you to demonstrate your expertise and help people, thus building a strong relationship with them. It is a win-win situation for both.
Receive Immediate Feedback
You will often need feedback from your audience about your products and other aspects of your business. You can conduct polls or ask questions and receive feedback from your audience in a short amount of time depending on the level of engagement your group has garnered.
Many businesses use a strategy wherein they conduct polls or ask questions to their audience about a product they are planning to release in future. By doing this, they’ll get a fair idea of how their target audience is going to perceive the product and thus decide whether it is a good idea to launch that product or not.
Place Call to Action that Converts
Groups enable you to pin important posts for all group members to see. This is a great opportunity to place a Call to Action that grabs the attention of your audience.
Although it’s not likely that all of your group members will respond to the Call to Action, most people eventually will. When people perceive you as a person who adds value, they will trust you and they’ll be much more inclined to respond to your Call for Action.
How to Setup a Facebook Group for your Business
Creating a Facebook group for your business is a simple process. But, what’s more important is the processes you should follow once the group is created.
Before creating a group, it’s ideal to create a facebook page for your business if you don’t already have one. Facebook does not have the option of publicly promoting groups. This is where your business page will come in handy. We will be discussing more on this later.
Let’s discuss the simple steps you need to follow to create a Facebook group;
1. Open Create Group Window
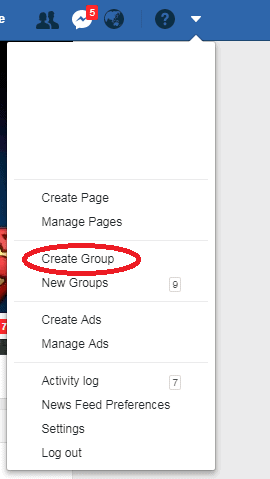
Open your profile and click the drop-down menu in the far right corner of the menu bar. Then, click on “Create Group”.
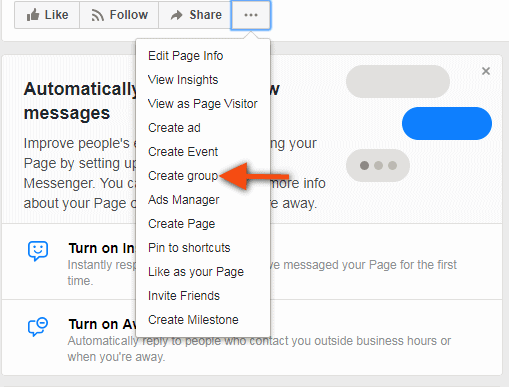
If you have a business page, the Create Group option is available on the bottom left corner of your page’s cover photo. (Also read our post on how to verify your Facebook business page)
2. Choose a Group Name
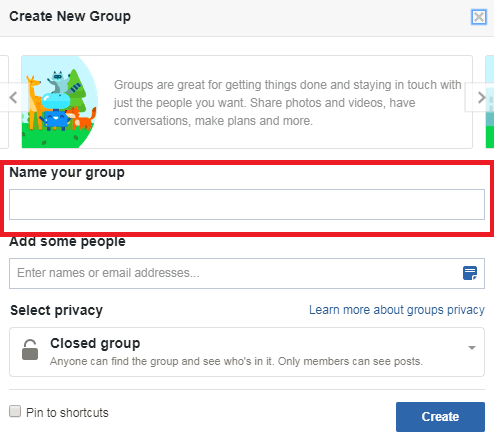
If you haven’t already chosen the name for your group, there is no need to over analyze the process. Your group name is not written in stone. If you don’t like the sound of it, you can change it later.
Facebook also gives you the freedom of creating as many groups as you want. So feel free to experiment until you find what suits you best. While choosing a group name, ensure that it gives a clear picture of what the group is about. Preferably the name of your business or the product, depending on what the group is created for.
You can also invite people you know, to join your group. However, you can keep this step for later consideration. If Facebook asks you to add at least 1 member before you create a group, that should not be a difficult task!
Keep one thing mind- Do not add people to your group without their permission. This will only create dummy members. If people don’t like to join your group, they will not participate actively in the discussions. This will hamper the engagement level in your group.
3. Choose Preferred Privacy Settings
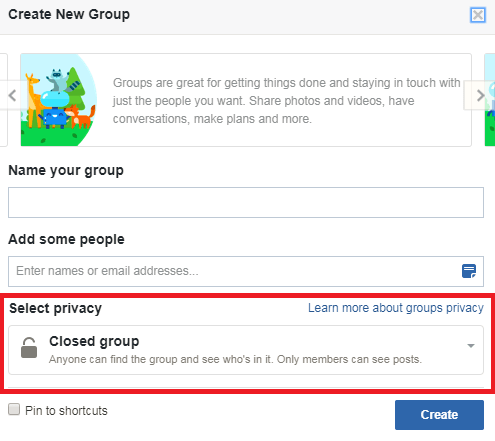
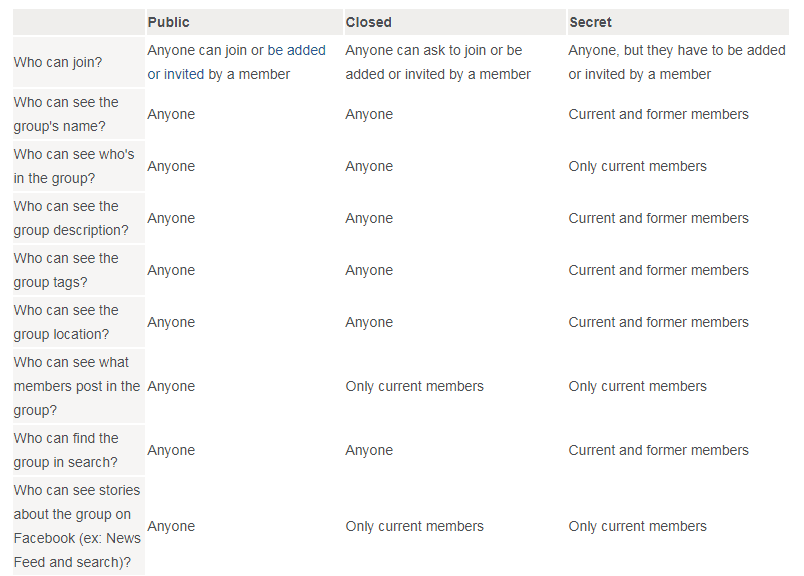
When you create a group, Facebook lets you choose between three privacy settings- Public, Closed and Secret. The image below is from Facebook, clearly describing the details related to each privacy setting.
It’s advisable to give some thought to this process before you decide to proceed. For a small group, the admin can change the privacy settings by going to the Edit Group Setting menu.
However, for a group having over 5000 members, you will only be allowed to change the privacy to a more restrictive setting (Public to Closed or Closed to Secret). Once you do that, you will have a 24-hour window to change your decision, after which it becomes irreversible. Once you have selected the privacy setting, click on Create.
4. Personalize Your Group
Your group is now available for you to see. However, to influence people to join your group, there is more work to be done.
Make sure you update the important elements like the Cover Photo, Description, Tags and Location, for your audience to clearly understand what the group is about. Choose an image that resonates with your group and need not always be about your brand or business. Utilize the description space to clearly articulate your group.
Ask yourself, “What do I look for in a group before i decide to join?” and act on those things for your group.
5. Edit the Membership and Posting Settings for Your Group
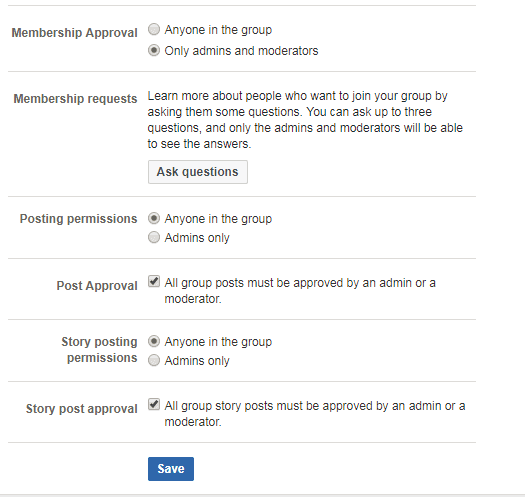
When increasing members, managing your becomes increasingly difficult if you don’t have the right settings in place. Depending on the nature of your group and your privacy settings, you can choose to either monitor all the posts before they go live or you can choose to be liberal about it.
By clicking the Edit Group Settings option just above the group wall, you can update the membership and post settings to suit your needs.
My suggestion- You are the King of your group and the King must have control over everything that happens in his kingdom!
6. Start Posting Content
Once you’re done with the ‘behind the scenes’ work, you can start pumping content to your group. The key is to follow a schedule and ensure that you post regularly. Always keep your group active.
As your group gets strong on members, the members will start conversations among themselves naturally. You’ll see more engagement with every post and all the efforts you’ve put into building your group will create a snowball effect.
How to Build Your Facebook Group
Once you’ve your group up and running, it’s the things that you do day in and day out that will make the difference. The group should be your top priority because if you put the work into it, it will reward you to multiple times the effort.
Here are some tips to help you build a following with high engagement;
1. Show Your Face Often
Initially, your group will have only a few members. This means that it’s up to you to initiate the discussions in the group.
When you are just starting out, you have the most valuable resource with you- TIME! With only a few members on board, make sure you comment on every post and answer the questions. Let people know that you are there when they need help. Help people perceive that they are part of a valuable community.
Also, encourage new members to introduce themselves. This helps them break out of the cocoon, show up more and participate actively in the discussions.
2. Set Guidelines for the Group
To build a healthy community, it’s important that you keep your group spam free. It is your group and you cannot allow random members to post spammy links and offend your valuable members.
To prevent this, you can create a post which clearly explains the Rules and Guidelines the members are expected to follow to be a part of the inner circle and pin that post. Pinned posts appear on the top of your group feed and enable all the members to see this upon joining your group.
It is possible that sometimes genuine members unknowingly post links by mistake or without the knowledge that it is inappropriate to do so. In such cases, you can delete the post and send them a personal message with a gentle warning reminding them of the group’s guidelines.
If the problem persists, do not hesitate to ban the member. You can’t take the risk of all the hard work that you’ve put into the group go in vain. As your group grows in size, it helps to keep a moderator to ensure the group is spam free.
3. Promote Your Group
No matter how good your content is, it is of no value if you don’t get people to notice it. It is the same with your group too.
A Facebook group has the potential to grow much faster than a page. But, the process does not happen overnight. It requires you to invest a significant amount of time and resources in the process.
There are many ways you can promote your group. Some of them are:
-
Promote Your Group in Other Groups
You can search Facebook for groups similar to yours. Before you start promoting, it is better to first introduce yourself to the admin and understand the group rules. Remember, you don’t want to look like a spammer and end up getting blocked by other groups.
Spend some time in the group and be a valuable contributor. Once you gain credibility, you can start promoting your content and your group as it will look more natural.
-
Encourage Influential People to Join Your Group
Start by making a list of people you want to add to your group. Then, share some of their content you found helpful to genuinely benefit the members of your group. When you share the content, make sure you tag the respective person to let them know that you’re promoting their content. Often this will encourage them to join your group on their own without having to look pushy. Simple trick, isn’t it?
-
Promote Your Group with Paid Ads
How can you do this if Facebook doesn’t have any option to directly promote your group? Remember the discussion we had about having a Facebook page for your business?
Your Facebook page may not get the level of engagement you desire, but it will help you a great deal in getting your group in public and even attract a lot of new members.
To promote your group using your business page, copy the link to your business group with a short, relevant description and post it on your page. You can then promote or boost the post to reach the targeted audience and get people to join your group.
Final Words
Congratulations! You are now equipped to create a Facebook group for your business and eventually grow it to attract more like-minded people. If you are serious about growing your business, then treat your business group as the top priority and put your heart and soul into it.
Also, it is important to enjoy the process. This goose isn’t going to give you the golden egg overnight. It takes patience and constant nourishment to see the results. If you are in it only for the result, then you’ll not have enough drive to follow through during challenging times. Enjoy every step of the process and focus on building a valuable asset for your business.
This post was originally published by Mayur Kamath at Startup Cafe’s Blog on Feb 6, 2018.
Related Articles
- How to Get Your Facebook Page Verified: A Step-by-Step Guide
- 10 Best Snapchat Accounts to Follow for Marketing Inspiration
- Best Times to Post on Social Media [Infographic]
- How to Advertise on Snapchat: A Detailed Guide to Snapchat Advertising
- How to Add Links to Your Instagram Stories to Drive Traffic and Sales

![How to Track Facebook Ads in Google Analytics [Video + Article] How to Track Facebook Ads in Google Analytics [Video + Article]](https://99signals.b-cdn.net/wp-content/uploads/2019/12/Facebook-Ads-in-Google-Analytics_99signals-218x150.png)

![[Video + Article] Publer Review: Is it Better than Hootsuite, Buffer, and SocialBee? Publer Review: Is it Better than Buffer, Hootsuite, and SocialBee?](https://99signals.b-cdn.net/wp-content/uploads/2023/06/Publer-Review-2023-99signals-218x150.png)
